Exploring Vite and its advantage in the world of development


In the fast-paced world of JavaScript development, build tools and frameworks are essential components of creating efficient and scalable web applications. Vite, a build tool renowned for its speed and performance, has garnered increasing popularity among developers. In this article, we'll delve deeper into Vite's features, explain how to set up a Vite project with Next.js, a powerful React framework, and explore why this combination is gaining traction in the developer community. We'll provide comprehensive instructions, code examples, and detailed explanations to help you harness Vite's capabilities effectively.
Addressing Development Bottlenecks
Before the advent of native ES modules (ESM) in browsers, JavaScript developers lacked a native way to organize their code in a modular fashion. This necessitated the use of bundlers like Webpack, Rollup, and Parcel to concatenate and process source modules into browser-compatible files. While these tools greatly improved the frontend development experience, as projects grew in complexity, they introduced performance bottlenecks.
As applications became more ambitious, the amount of JavaScript code also increased dramatically. Large-scale projects could contain thousands of modules, leading to slow development server startup times. In some cases, developers had to endure unreasonably long waits, sometimes up to minutes, to initialize a dev server. Even with Hot Module Replacement (HMR) enabled, file edits could take several seconds to reflect in the browser, impacting developers' productivity and satisfaction.
Vite's Approach to Slow Server Start
Vite addresses these issues by leveraging two significant advancements in the JavaScript ecosystem: the availability of native ES modules in browsers and the emergence of JavaScript tools written in compile-to-native languages.
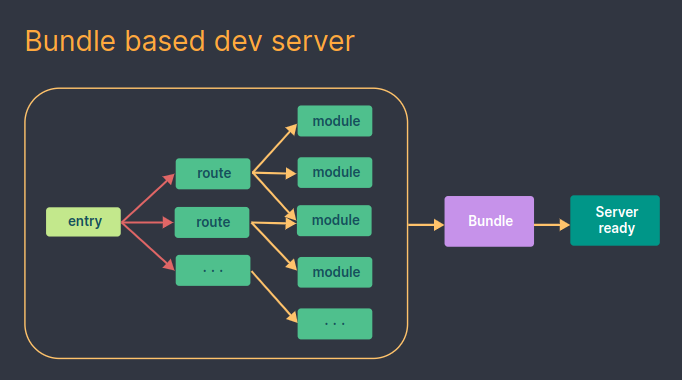
When starting the dev server, a bundler-based build setup typically needs to crawl and build the entire application from scratch before it can serve it. Vite, on the other hand, optimizes server startup time by categorizing modules into two groups: dependencies and source code.
Dependencies consist primarily of plain JavaScript and tend to remain stable during development. Some larger dependencies, such as component libraries with numerous modules, can be costly to process. Dependencies may also be available in various module formats, such as ESM or CommonJS. Vite pre-bundles these dependencies using esbuild, a Go-based tool that achieves pre-bundling 10-100 times faster than JavaScript-based bundlers.
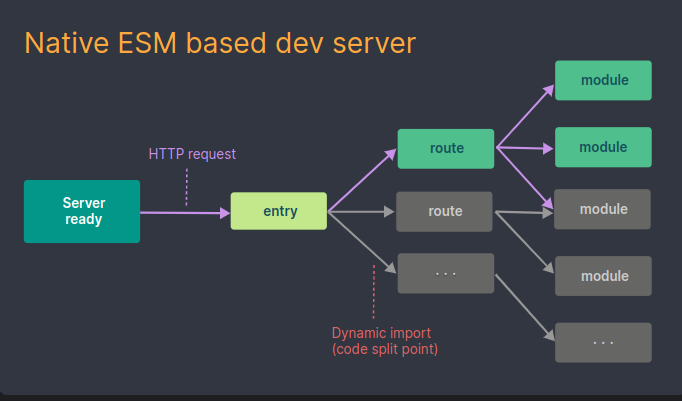
Source code, on the other hand, often contains non-plain JavaScript that requires transformation (e.g., JSX, CSS, or Vue/Svelte components) and is frequently edited. Not all source code needs to load simultaneously, particularly with route-based code splitting. Vite serves source code using native ESM, enabling the browser to assist with part of the bundling process. Vite only transforms and serves source code on demand as the browser requests it. Code behind conditional dynamic imports is processed only when needed on the current screen.
Go through the images below to understand the difference between a bundle based server and a native esm based server.
The Power of Vite
Before we dive into setting up a Vite project with Next.js, let's take a closer look at the key features that make Vite stand out.
Blazing-Fast Development Server
Vite's development server is exceptionally fast, thanks to its clever use of native ES modules (ESM) and modern browser capabilities. By serving individual files during development instead of bundling them, Vite minimizes build times and significantly accelerates the development cycle.
No Bundling in Development
Unlike traditional build tools, Vite abstains from bundling code during development. Instead, it leverages ESM to serve individual files, drastically reducing the time it takes to see changes in your application. This approach is particularly beneficial when working with large codebases.
Seamless Integration with Frameworks
Vite is designed to seamlessly integrate with popular JavaScript frameworks, such as Vue.js and React.js. This makes it a versatile choice for a wide range of projects, as you can take full advantage of your chosen framework's capabilities while benefiting from Vite's speed and efficiency.
Extensibility via Plugins
Vite's plugin system empowers developers to customize and extend its functionality according to the specific requirements of their projects. Whether you need to add support for a new file type or integrate with a third-party tool, Vite's extensibility makes it possible.
Now that we understand why Vite is a valuable addition to your development toolbox, let's proceed with setting up a Vite project that integrates seamlessly with Next.js.
Setting Up a Basic Vite and Next.js Project
To harness the power of Vite and Next.js together, you'll need to have Node.js installed on your machine. Once Node.js is set up, you can create a new Vite project integrated with Next.js by following these steps.
Step 1: Install Vite and Create a Project
Start by installing the Vite CLI globally:
npm install -g create-vite
With the Vite CLI installed, create a new Vite project:
create-vite my-next-vite-project
Step 2: Project Structure
Once the project is created, navigate to its directory:
cd my-next-vite-projectHere's the basic structure of a Vite project integrated with Next.js:
my-next-vite-project/
├── node_modules/
├── public/
├── src/
├── .gitignore
├── package.json
├── README.md
├── vite.config.js
Where in vite.config.js is the Vite configuration file where you can customize build options and plugins.
Step 3: Running the Development Server
Start the development server with the following command:
npm run dev
This command will launch the Vite development server, and you can access your integrated Next.js app at http://localhost:3000 by default.
Building a Simple Next.js Application with Vite
Now that we have our Vite and Next.js project set up, let's create a simple Next.js application.
Step 1: Creating a Next.js Page
In the src/ directory, create a new Next.js page by creating a file named index.js. This file will serve as the entry point for your Next.js app:
import React from 'react';

function HomePage() {
  return (
    <div>
      <h1>Hello, Vite + Next.js!</h1>
    </div>
  );
}

export default HomePage;
This simple Next.js page defines a welcome message.
Step 2: Displaying the Page
To display this page, open the src/App.js file and add the following code:
import HomePage from './index'; // Import the Next.js page

function App() {
  return (
    <div className="App">
      <HomePage />
    </div>
  );
}

export default App;
This code imports the HomePage component and integrates it into your React app.
Step 3: Run the Development Server
Start the development server again with npm run dev. Your Next.js app, powered by Vite, will be accessible at http://localhost:3000.
Congratulations! You've successfully set up a Vite project integrated with Next.js and created a simple Next.js application within it.
Creating a Form
Step 1: Create a Form Component
In your Vite and Next.js project, create a new component that represents the user record form. You can create a file named UserForm.js in the src directory:
import React, { useState } from 'react';

function UserForm() {
  const [formData, setFormData] = useState({
    firstName: '',
    lastName: '',
    email: '',
    age: '',
  });

  const handleChange = (e) => {
    const { name, value } = e.target;
    setFormData({
      ...formData,
      [name]: value,
    });
  };

  const handleSubmit = (e) => {
    e.preventDefault();
    console.log('Submitted Data:', formData);
  };

  return (
    <div>
      <h2>User/Student Record Form</h2>
      <form onSubmit={handleSubmit}>
        <div>
          <label htmlFor="firstName">First Name:</label>
          <input
            type="text"
            id="firstName"
            name="firstName"
            value={formData.firstName}
            onChange={handleChange}
          />
        </div>
        <div>
          <label htmlFor="lastName">Last Name:</label>
          <input
            type="text"
            id="lastName"
            name="lastName"
            value={formData.lastName}
            onChange={handleChange}
          />
        </div>
        <div>
          <label htmlFor="email">Email:</label>
          <input
            type="email"
            id="email"
            name="email"
            value={formData.email}
            onChange={handleChange}
          />
        </div>
        <div>
          <label htmlFor="age">Age:</label>
          <input
            type="number"
            id="age"
            name="age"
            value={formData.age}
            onChange={handleChange}
          />
        </div>
        <div>
          <button type="submit">Submit</button>
        </div>
      </form>
    </div>
  );
}

export default UserForm;
This component defines a simple form with fields for first name, last name, email, and age. It uses React's state to capture user input and logs the submitted data to the console upon form submission.
Step 2: Incorporate the Form in Your App
Now, let's integrate the UserForm component into your app. Open the src/App.js file and import the UserForm component. You can replace the existing code with the following:
import React from 'react';
import './App.css';
import UserForm from './UserForm'; // Import the UserForm component

function App() {
  return (
    <div className="App">
      <UserForm /> {/* Render the UserForm component */}
    </div>
  );
}

export default App;
This code imports the UserForm component and renders it within your application.
Step 3: Run Your Application
Now, you can run your Vite and Next.js application using npm run dev. Navigate to http://localhost:3000, and you'll see the User Record Form.
Step 4: Test the Form
Fill in the form with sample user data and click the "Submit" button. You'll notice that the submitted data is displayed in the console, as defined in the handleSubmit function within the UserForm component.
If you follow the steps correctly you can expect the image shown below as output:
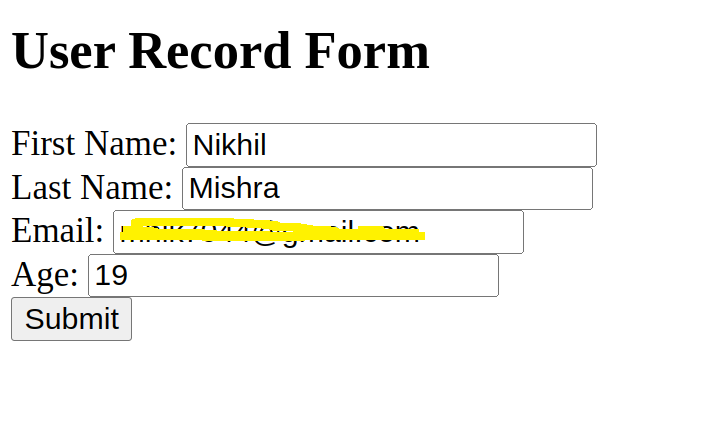
Congratulations! You've successfully added a user record form to your Vite and Next.js project and are capturing and displaying the submitted data in the console. You can further enhance this by sending the data to a backend API or saving it to a database for more comprehensive record keeping.
Conclusion
Vite and Next.js, when used together, provide a powerful and efficient development environment for building modern JavaScript web applications. In this article, we've explored Vite's key features, explained how to set up a Vite project integrated with Next.js, and created a basic Next.js application within it. This combination of technologies can significantly enhance your JavaScript development workflow and is well-suited for a wide range of projects.