Getting Started with Spring Batch


The best way to design a system for handling bulk workloads is to make it a batch system. If we are already using Spring, it will be easy to add a Spring Batch to the project. Spring Batch provides a lot of boiler plate features required for batch processing like chunk based processing, transaction management and declarative input/output operations. It also provides job control for start, stop, restart, retry and skip processing also.
Spring has recently released 4.3.x and it is licensed under Apache-2.0 License. It is supported under the OSS support policy. Also it provides commercial support till end of the life product. There are many samples available in the spring batch samples github project.
It is a lightweight, comprehensive solution designed to enable the development of robust batch applications, which are often found in modern enterprise systems. Spring Batch builds upon the POJO-based development approach of the Spring Framework.
Batch Job Basics:
Spring batch has the traditional batch architecture. Each process workflow is termed as a batch job which internally consists of multiple steps. Each step can consist of any or all of the sequence steps of reading, processing and writing the data. Spring framework itself provides many heavy-lifting tasks of starting the project, executing jobs which in turn execute the steps inside each job, also readers and writers for database, jms, jdbc, files and so on.
When we code for a batch, it needs to be little different from the traditional way of development done for web development. In web development we generally read one or few records based on the web request. But in the batch, we need to typically all reads to be done in bulk way and do bulk process and then write in bulk, I/O readers and writers will give a benefit for reading and writing in bulk. Typically for a large volume of writes, if we do one by one it will take time, but if we do it in bulk, writes will be faster.
As part of this blog, we will create a simple tasklet to do some ad-hoc task continuously in a batch job process for a period of time. This will help us to understand how to do a work in a non conventional way without reader and writers. The job and step execution stats will be persisted in the configured data source. Here we are going to persist in the h2 embedded file. Data source configuration can be configured through the application.properties with driver, dialect and datasource location.
spring.datasource.URL=jdbc:h2:file:/opt/projects/springbatchexamples/batch db
spring.batch.jdbc.initialize-schema=always
spring.datasource.username=sa
spring.datasource.password=
spring.jpa.database-platform=org.hibernate.dialect.H2Dialect
@EnableBatchProcessing Annotation:
In the configuration class, we need to introduce the @EnableBatchProcessing annotation. This is the batch configuration class to bootstrap JobBuilderFactory, StepBuilderFactory, JobRepository, TransactionManager, DatasourceTransactionManager and other batch related components. It will save a lot of configuration work by giving pre-built beans. By default, it executes all Jobs in the application context on startup. You can narrow down to a specific job or jobs by specifying spring.batch.job.names (which takes a comma-separated list of job name patterns).
@EnableBatchProcessing
public class BatchConfiguration extends DefaultBatchConfigurer {
JobBuilderFactory
JobBuilderFactory provides the strategy to create a job with a job name and having the incrementer for having unique job parameters value available for each job instance. It needs to include the start method to mention the step to be started and then build the job bean, so while bootstrapping the batch application, the job will be picked up for the execution.
    @Bean
    public Job importUserJob(JobCompletionNotificationListener listener, Step step1) {
        return jobBuilderFactory.get("awsbatch")
					.incrementer(new RunIdIncrementer())
					.listener(listener)
					.flow(step1)
					.end()
                    .build();
    }
StepBuilderFactory
StepBuilderFactory provides the strategy to create the step with step name. We will add the time also to make the step name unique for each run. It will have the throttlelimit one as there will be one tasklet. To do some ad-hoc task without any reader or writer, it can be done by Tasklet.
       @Bean
	protected Step step1() throws Exception {
		String epochStr = String.valueOf(new Date().getTime());
		return this.steps.get("step1v" + epochStr)
						 .tasklet(tasklet())
						 .throttleLimit(1)
						 .build();
	}
Listeners
Listeners are available at job and step level. It has both before and after job or step level execution. In our example, we will put the starttime in the before job execution as we are going to execute the tasklet for a period of time. It will be a time bounded job execution. StartTime value is kept inside the jobExecution context. It allows us to put key value pairs in the job execution context.
public class JobExecutionListener extends JobExecutionListenerSupport {

	    public void afterJob(JobExecution jobExecution) {
			System.out.println("after Job Time" + new Date().toString());
	    }

	    public void beforeJob(JobExecution jobExecution) {
			System.out.println("before job time " + new Date().toString());
			jobExecution.getExecutionContext().put("startTime", new Date());
	    }

	}
Tasklet Configuration
Tasklet will be a separate instance created for tasklet bean where the execute method is the task to be run will be kept. It is similar to the run method in the runnable and this execute method has ChunkContext and StepContribution.
ChunkContext - Each chunk execution run context will be stored and have provision to store user defined parameters.
StepContribution - Tasklet triggered step parameters with job parameters are available during the tasklet execution. It has the stats of the jobs like read, write, skip, filters etc.,
In the chunk context, times value is stored and each time it will be incremented. If the step execution gets repeated with the repeatStatus as continuable, the tasklet will be executed again. We will be returning continuously until the elapsed time is 5 seconds. To find the elapsed time, job start time is present in the job execution context and compare with the current time.
@Bean
protected Tasklet tasklet() {
return new Tasklet() {
	@Override
	public RepeatStatus execute(StepContribution contribution,
			ChunkContext context) {

		Date startTime = (Date)context.getStepContext()
							  .getJobExecutionContext()
							  .get("startTime");

		Date currentTime = new Date();

		Integer value = (Integer) context.getAttribute("times");

		if ( value == null) {
			value = 0;
		}

		context.setAttribute("times", ++value);
		System.out.println("This is tasklet execution for" + value + " times");

		System.out.println(context.toString());
		System.out.println(contribution.toString());

		if (currentTime.getTime() - startTime.getTime() > 5000)
			return RepeatStatus.FINISHED;
		else
			return RepeatStatus.CONTINUABLE;
	}
};
}
Spring batch job can be generated from maven archtetype by just running the below command. It will run in an interactive mode, choose the Spring batch archetype number(2803) and then provide the group artifact id to generate the batch job with the project.
mvn archetype:generateThen update to the recent spring boot parent version to get the latest of the spring batch version.
<parent>
        <!-- Your own application should inherit from spring-boot-starter-parent -->
        <groupId>org.springframework.boot</groupId>
        <artifactId>spring-boot-starter-parent</artifactId>
        <version>2.6.3</version>
</parent>
There will be few changes in spring boot test package and h2 dependency runtime so it will be used only at the execution time. Likewise the import package has to be changed for outputcapture class. For more information, please refer to the github branch.
		<dependency>
			<groupId>com.h2database</groupId>
			<artifactId>h2</artifactId>
			<scope>runtime</scope>
		</dependency>
		<dependency>
			<groupId>org.springframework.boot</groupId>
			<artifactId>spring-boot-test</artifactId>
		</dependency>
		<!-- https://mvnrepository.com/artifact/junit/junit -->
		<dependency>
			<groupId>junit</groupId>
			<artifactId>junit</artifactId>
			<version>4.13.2</version>
			<scope>test</scope>
		</dependency>
Now if we run the project with "sudo mvn clean install", it will run the spring batch test job by which we can confirm whether the batch job runs for a period of time and gets stopped.
sudo java -jar target/springbatchexamples-1.0-SNAPSHOT.jar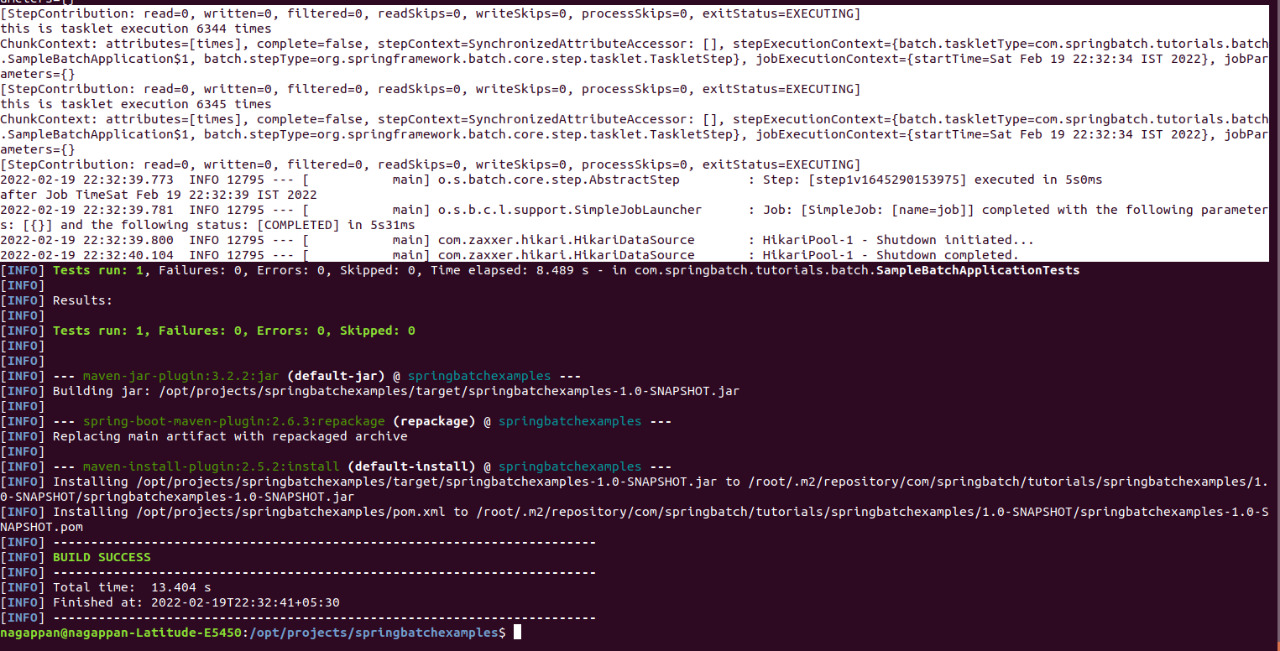
To know the job and step repository run the h2 jar, it will be under the .m2 repository location.Trigger the java jar file.
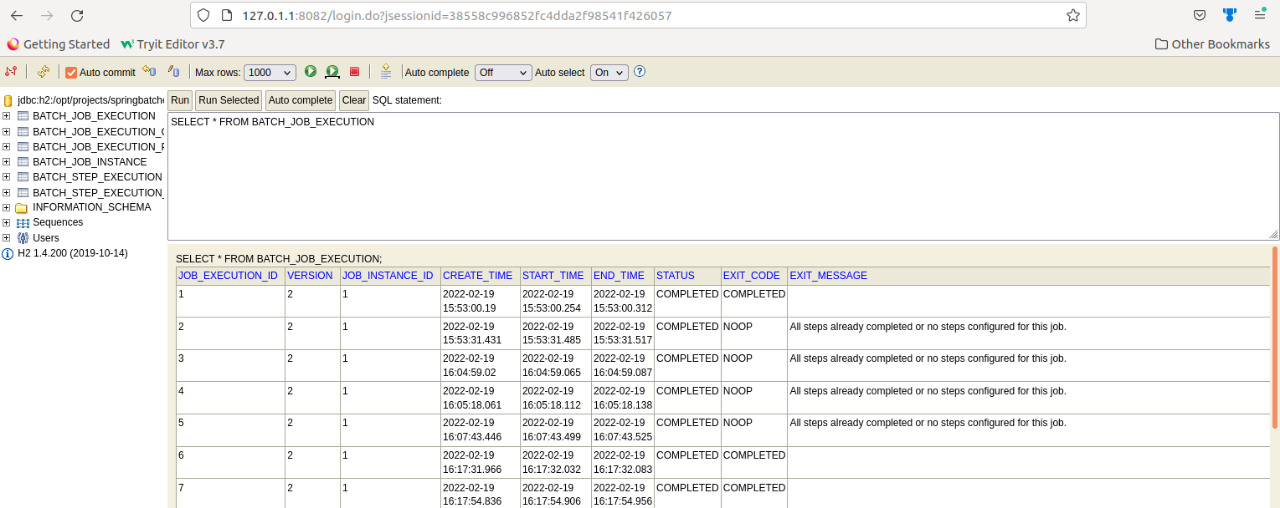
~/.m2/repository/com/h2database/h2/1.4.200$ java -jar h2-1.4.200.jarIt opens up the browser with the h2 login, where we mention the location of the embedded h2 file to open up.
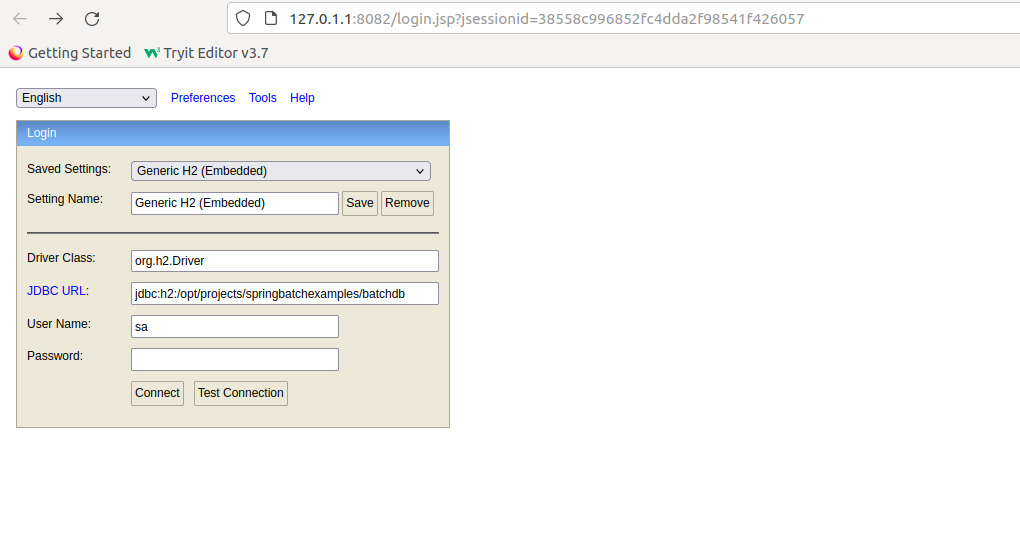
Then it opens up the list of the tables where we trigger the sql to see the job details. It will be shown as below: